Spring Security is a security framework that provides a wide range of security capabilities for Java-based applications. It offers support for multiple authentication mechanisms like username/password, LDAP, OAuth, and OpenID Connect. This allows for the verification of user credentials in different ways. In addition to authentication, Spring Security also has a powerful authorization system that assigns special access rights to users and enforces authorization controls on specific resources. It supports different approaches to authorization such as role-based and permission-based. Today, we will be discussing OAuth and its fundamental concepts. We will also explore code examples and touch upon various other topics and methods.
What Authentication and Authorization are?
Authentication
Authentication is the process of verifying the identity of an individual, entity, or website. In the context of web applications, authentication typically involves the submission of a username or identifier and one or more private pieces of information that only a specific user should know.
Authorization
After verifying the identity of an entity, the process of authorization takes place. Simply confirming a user’s identity does not necessarily give them access to every resource or every action within a system. In a web application, there may be both regular users and administrators. Even if authentication has been completed, administrators may have privileges that regular users do not possess.
JSON Web Token
A JSON Web Token is created during authentication to communicate information about the client’s identity and claims. The server verifies this token before any transactions take place.
Token structure
eyJhbGciOiJIUzUxMiIsInR5cCI6IkpXVCJ9.eyJpZCI6MSwiaXNzIjoidGVzdCIsImlhdCI6MTcwNDg3MjM0OSwiZXhwIjoxNzA0ODcyNjQ5fQ.jXoU-5T0byKUpjWFUtST4mni-Wy9XbqxabtGhqCNyyfXmFixnn0fzhUINfix_Nj_T92yTT3ymGUBkPZlkZPtZQ
HEADER:ALGORITHM & TOKEN TYPE
{
  "alg": "HS512",
  "typ": "JWT"
}
PAYLOAD:DATA
{
  "id": 1,
  "iss": "test",
  "iat": 1704872349,
  "exp": 1704872649
}
VERIFY SIGNATURE
HMACSHA512(
  base64UrlEncode(header) + "." +
  base64UrlEncode(payload),
)
The signature is generated by HMAC-SHA512 algorithm (in this example).
Let’s discuss the process of creating a new structure using code examples.
To begin, we will create a Spring boot project. Next, we should add the main dependencies required for the project. Depending on which database you want to use, you should add the relevant dependencies. I personally used Postgresql, so I will share its dependency with you.
ext {
    versions = [
            springBoot: "3.2.1",
            postgreSql: "42.6.0",
            lombok    : "1.18.26",
            jwt       : "4.4.0"

    ]

    libs = [
            springBootWeb       : "org.springframework.boot:spring-boot-starter-web:${versions.springBoot}",
            springBootJpa       : "org.springframework.boot:spring-boot-starter-data-jpa:${versions.springBoot}",
            postgreSql          : "org.postgresql:postgresql:${versions.postgreSql}",
            mongoDB             : "org.springframework.boot:spring-boot-starter-data-mongodb:${versions.springBoot}",
            rabbitMQ            : "org.springframework.boot:spring-boot-starter-amqp:${versions.springBoot}",
            springBootValidation: "org.springframework.boot:spring-boot-starter-validation:${versions.springBoot}",
            lombok              : "org.projectlombok:lombok:${versions.lombok}",
            springBootSecurity  : "org.springframework.boot:spring-boot-starter-security:${versions.springBoot}",
            jwt                 : "com.auth0:java-jwt:${versions.jwt}"
    ]
}
Proceed with creating the following classes: Auth Entity, Role Enum, Repository, Service, and Controller.
JwtService – Create Token
The id information of the logged-in user to generate a new token for them.
The information you embed in the claims object is openly readable.
For example, sensitive information such as email and password should not be included in the claims section.
@Service
public class JwtService {

    @Value("${security.oauth2.jwt.secret-key}")
    private String secretKey;

        String token;
        Long expireDate = 1000L * 60 * 5;
        try {
            Date issuedAt = new Date();
            Date expiresAt = new Date(System.currentTimeMillis() + expireDate);
            token = JWT.create()
                    .withClaim("id", id)
                    .withIssuer("test")
                    .withIssuedAt(issuedAt)
                    .withExpiresAt(expiresAt)
                    .sign(Algorithm.HMAC512(secretKey));
            return Optional.of(token);
        } catch (Exception exception) {
            return Optional.empty();
        }
    }
        try {
            Algorithm algorithm = Algorithm.HMAC512(secretKey);
            JWTVerifier jwtVerifier = JWT.require(algorithm)
                    .withIssuer("test")
                    .build();
            DecodedJWT decodedJWT = jwtVerifier.verify(token);
            Date expiresAt = decodedJWT.getExpiresAt();
            if (expiresAt != null && expiresAt.after(new Date())) {
                return Optional.of(decodedJWT.getClaim("id").asLong());
            } else {
                return Optional.empty();
            }
        } catch (Exception exception) {
            return Optional.empty();
        }
    }
}
UserDetails – UserDetailsService
UserDetails is returned by UserDetailsService. DaoAuthenticationProvider is an implementation of AuthenticationProvider that validates the identity of a username and password using UserDetailsService and PasswordEncoder. It authenticates UserDetails and then returns an Authentication with a principal that is a UserDetails returned by the configured UserDetailsService.
@Service
@RequiredArgsConstructor
public class JwtUserDetails implements UserDetailsService {

    private final AuthService authService;

    @Override
    public UserDetails loadUserByUsername(String username) throws UsernameNotFoundException {
        return null;
    }

    public UserDetails getUserByAuthId(Long id) {
        Optional<Auth> auth = authService.findById(id);
        if (auth.isEmpty()) {
            return null;
        }
        List<GrantedAuthority> authorities = new ArrayList<>();
        authorities.add(new SimpleGrantedAuthority(auth.get().getRole().name()));
        return User.builder()
                .username(auth.get().getUsername())
                .password("")
                .accountExpired(false)
                .accountLocked(false)
                .authorities(authorities)
                .build();
    }
}
JwtFilter
It is necessary to check whether there is token information in the incoming request. If the user has already been authenticated previously, we return the incoming request as is without any additional processing to avoid performing extra steps in this case.
@Component
public class JwtFilter extends OncePerRequestFilter {

    private final JwtService jwtService;
    private final JwtUserDetails jwtUserDetails;

    public JwtFilter(JwtService jwtService, JwtUserDetails jwtUserDetails) {
        this.jwtService = jwtService;
        this.jwtUserDetails = jwtUserDetails;
    }

    @Override
    protected void doFilterInternal(HttpServletRequest request, HttpServletResponse response, FilterChain filterChain) throws ServletException, IOException {
        final String authHeaderParameters = request.getHeader("Authorization");
        if (authHeaderParameters != null && authHeaderParameters.startsWith("Bearer ")
                && SecurityContextHolder.getContext().getAuthentication() == null) {
            String token = authHeaderParameters.substring(7);
            Optional<Long> authId = jwtService.getIdFromToken(token);
            if (authId.isPresent()) {
                UserDetails userDetails = jwtUserDetails.getUserByAuthId(authId.get());
                UsernamePasswordAuthenticationToken authToken = new UsernamePasswordAuthenticationToken(
                        userDetails, null, userDetails.getAuthorities());
                SecurityContextHolder.getContext().setAuthentication(authToken);
            } else {
                try {
                    throw new Exception("Token create error");
                } catch (Exception e) {
                    throw new RuntimeException(e);
                }
            }
        }
        filterChain.doFilter(request, response);
    }
}
After configuring all the necessary settings for JWT, let’s take a closer look at the AuthService. As an additional security measure, we encode the password during the registration process.
The required configuration is:
@Configuration
public class PasswordEncoding {

    @Bean
    public PasswordEncoder passwordEncoder() {
        return new BCryptPasswordEncoder();
    }
}
Httpsecurity – Create a configuration class in AuthService that will allow us to specify the role-based accessibility for the implemented methods.
@Configuration
@RequiredArgsConstructor
@EnableWebSecurity
@EnableMethodSecurity
public class SecurityConfig {

    private final JwtFilter jwtFilter;

    @Bean
    public SecurityFilterChain securityFilterChain(HttpSecurity httpSecurity) throws Exception {
        httpSecurity
                .csrf(AbstractHttpConfigurer::disable)
                .authorizeHttpRequests(r -> r.requestMatchers("api/v1/auth/register", "api/v1/auth/login").permitAll()
                        .requestMatchers("api/v1/auth/find-all").hasRole(Role.ROLE_ADMIN.getValue())
                        .anyRequest().authenticated()
                )
                .addFilterBefore(jwtFilter, UsernamePasswordAuthenticationFilter.class);
        return httpSecurity.build();
    }
}
In short, it is explained here that while any user can access the endpoints “api/v1/auth/register” and “api/v1/auth/login”, having the admin role is required to make requests to the “api/v1/auth/find-all” endpoint.
After completing all the codes (you can access the full code from my GitHub account), let’s run the project and send requests through Postman to check the access permissions specified in the configuration above.
Register an account, then proceed with the login process. After successfully logging in, a token will be created.
Copy this token.
Send a GET request to : http://localhost:8081/api/v1/auth/find-all
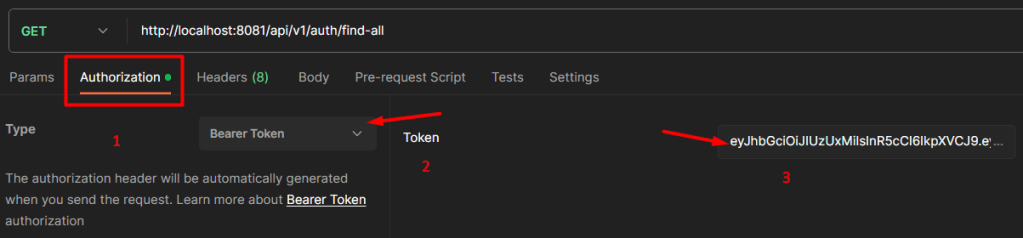
Make sure to add the Bearer Token in the Authorization section.(shown above)
You will observe that, if your role is admin, you can access all users; otherwise, you cannot.
To summarize, the code snippets provided demonstrate the implementation of OAuth 2.0 authentication using Spring Security in a Java-based Spring Boot application. This setup ensures secure user authentication and authorization in a Spring Boot application.
References:
https://cheatsheetseries.owasp.org/cheatsheets/Authentication_Cheat_Sheet.html
https://cheatsheetseries.owasp.org/cheatsheets/Authorization_Cheat_Sheet.html
https://docs.spring.io/spring-security/reference/features/authentication/password-storage.html
https://cheatsheetseries.owasp.org/cheatsheets/Password_Storage_Cheat_Sheet.html
https://cheatsheetseries.owasp.org/cheatsheets/REST_Security_Cheat_Sheet.html
https://docs.spring.io/spring-security/reference/6.1-SNAPSHOT/servlet/configuration/java.html
https://cheatsheetseries.owasp.org/cheatsheets/JSON_Web_Token_for_Java_Cheat_Sheet.html
