The microservices architecture is an important aspect of modern application development. It involves breaking down the application into small, independent services, with each running as a separate microservice. However, enabling data and information exchange between these small services can be a challenging.
Spring Boot facilitates fast and efficient development of microservices. In this article, we will examine the use of RabbitMQ, which acts as a messaging system that relies on the AMQP protocol to ensure reliable and flexible communication between these services.AMQP, the underlying protocol of RabbitMQ, establishes a standardized communication interface.
Before we dive into code examples, let’s go over the key terms related to RabbitMQ.
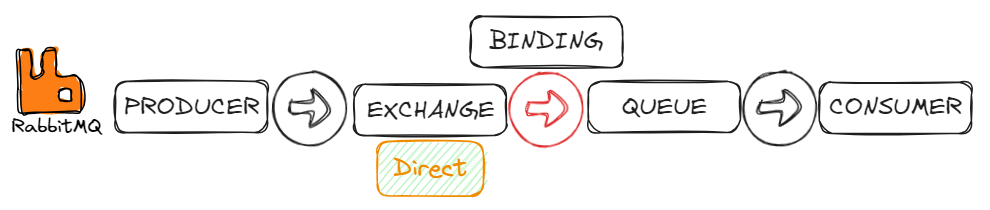
What are Exchange, Queue, and Binding?
Exchange
Exchanges are entities in AMQP where messages are sent. The exchanges route messages into queues.
Exchange Types
The choice of exchange type depends on the specific requirements of your application and how you want messages to be routed to queues.
1. Direct exchange
Direct Exchange routes messages to a specific queue based on a routing key. It is useful for sending messages directly to a specific queue.
2. Fanout exchange
A fanout exchange sends messages to all its queues, ignoring the routing key.
This is a great option when you need to send a message to a large group of people at once. It allows you to easily distribute the same message to multiple recipients.
3. Topic exchange
Topic exchanges route messages to one or many queues based on a matching between a message routing key and the pattern used to bind the queue to an exchange.
Ideal for scenarios where messages can be routed to multiple queues based on specific criteria.
4. Headers exchange
A headers exchange routes messages based on message headers instead of routing keys.
Queue
Queues are the fundamental components for storing and managing messages in RabbitMQ. It is a destination for messages sent by producers and consumed by consumers.
Binding
Binding is the link or association between an exchange and a queue. It defines the rules for how messages should flow from an exchange to a queue.
Producer and Consumer
Producers are responsible for creating and sending messages to RabbitMQ, while consumers subscribe to queues, retrieve messages, and perform actions based on the received messages. This producer-consumer pattern enables asynchronous communication between different parts of a distributed system, providing flexibility, scalability, and decoupling between components.
Spring Boot project we’re going to create, there will be two microservices for authentication and user functionalities. In this scenario, when a user registers through the auth-service, we want their information to be recorded in the user-service as well. In the code example below, we will cover sending and receiving messages using a Direct Exchange.
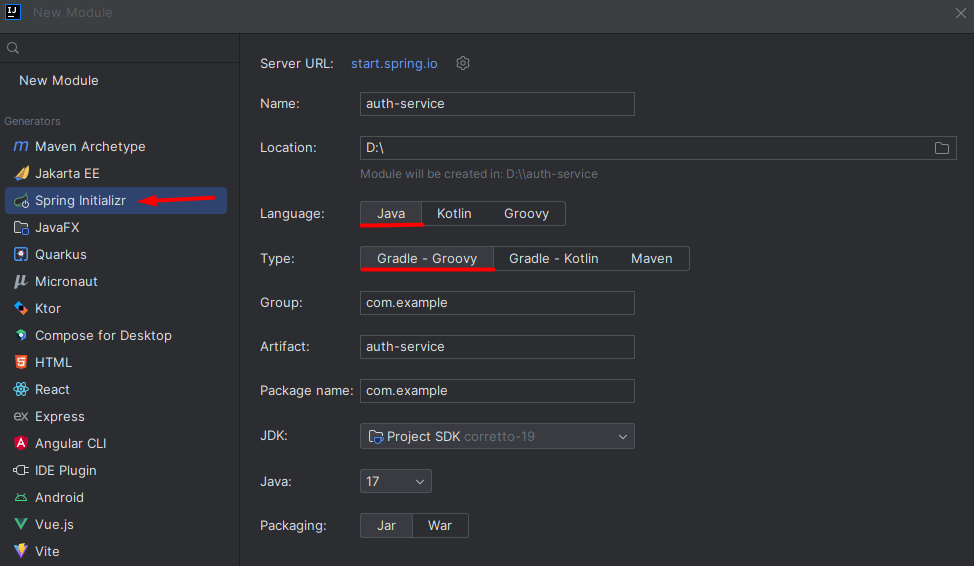
1. Create auth-service and user-service modules using Spring Initializr.
2.Add dependencies
auth-service/build.gradle:
implementation 'org.springframework.boot:spring-boot-starter-web'
implementation 'org.postgresql:postgresql:42.6.0'
implementation 'org.springframework.boot:spring-boot-starter-data-jpa'
implementation 'org.springframework.boot:spring-boot-starter-amqp'
user-service/build.gradle:
implementation 'org.springframework.boot:spring-boot-starter-web'
implementation 'org.springframework.boot:spring-boot-starter-data-mongodb'
implementation 'org.springframework.boot:spring-boot-starter-amqp'
3.Setup RabbitMQ, PostgreSQL and MongoDB
If you have Docker installed locally, you can quickly start RabbitMQ, PostgreSQL, and MongoDB servers using Docker.
– RabbitMQ
docker run -d -e RABBITMQ_DEFAULT_USER=user -e RABBITMQ_DEFAULT_PASS=secret -p 5672:5672 -p 15672:15672 rabbitmq:3-management
– PostgreSQL
docker run -d --name some-postgres -e POSTGRES_PASSWORD=secret -e PGDATA=/var/lib/postgresql/data/pgdata -v /custom/mount:/var/lib/postgresql/data -p 5432:5432 postgres
– MongoDB
docker run -d -e MONGO_INITDB_ROOT_USERNAME=mongoadmin -e MONGO_INITDB_ROOT_PASSWORD=secret -p 27017:27017 mongo
4.Application.yaml
auth-service/application.yaml:
server:
  port: 9090

spring:
  datasource:
    driver-class-name: org.postgresql.Driver
    username: postgres
    password: secret
    url: jdbc:postgresql://localhost:5432/RabbitExampleDB
  jpa:
    hibernate:
      ddl-auto: update
    show-sql: true
  rabbitmq:
    host: localhost
    port: 5672
    username: user
    password: secret
user-service/application.yaml:
server:
  port: 9091

spring:
  data:
    mongodb:
      host: localhost
      port: 27017
      database: rabbitExample
      username: mongoadmin
      password: secret
  rabbitmq:
    host: localhost
    port: 5672
    username: user
    password: secret
5.Create POJOs, Controllers, Services and Repositories
6.Define Direct Exchange, Queues, and Bindings
@Configuration
public class RabbitmqConfig {

    private final String exchange = "auth-exchange";
    private final String authQueue = "auth-to-user-register-queue";
    private final String authKey = "auth-to-user-register-key";

    @Bean
    DirectExchange authExchange() {
        return new DirectExchange(exchange);
    }

    @Bean
    Queue registerQueue() {
        return new Queue(authQueue);
    }

    @Bean
    public Binding registerBinding(final DirectExchange authExchange, final Queue registerQueue) {
        return BindingBuilder.bind(registerQueue).to(authExchange).with(authKey);
    }
}
7.Producer (Auth-service)
@Service
public class RegisterProducer {
    private final RabbitTemplate rabbitTemplate;
    private final String exchange = "auth-exchange";
    private final String authKey = "auth-to-user-register-key";

    public RegisterProducer(RabbitTemplate rabbitTemplate) {
        this.rabbitTemplate = rabbitTemplate;
    }

    public void sendRegisterMessage(RegisterModel registerModel) {
        rabbitTemplate.convertAndSend(exchange, authKey, registerModel);
    }

}
RabbitTemplate: Providing methods to convert Java objects to AMQP messages and send them to specified exchanges with routing keys.
8.Model
Usually refers to the object or structure in which a message is represented. Make sure that the contents of both services are the same.
public class RegisterModel implements Serializable {
    private Long authId;
    private String name;
    private String surname;
    private String email;
    private String password;

	//getter and setter
}
9.Now let’s fill in the model and send it to user-service
auth-service/service:
@Service
public class AuthService {
    private final IAuthRepository authRepository;
    private final RegisterProducer registerProducer;

    public AuthService(IAuthRepository authRepository, RegisterProducer registerProducer) {
        this.authRepository = authRepository;
        this.registerProducer = registerProducer;
    }

    public Boolean save(SaveRequestDto dto) {
        Auth auth = new Auth();
        auth.setName(dto.getName());
        auth.setSurname(dto.getSurname());
        auth.setEmail(dto.getEmail());
        auth.setPassword(dto.getPassword());
        authRepository.save(auth);

        RegisterModel registerModel = new RegisterModel();
        registerModel.setAuthId(auth.getId());
        registerModel.setName(auth.getName());
        registerModel.setSurname(auth.getSurname());
        registerModel.setEmail(auth.getEmail());
        registerModel.setPassword(auth.getPassword());
        registerProducer.sendRegisterMessage(registerModel);
        return true;
    }
}
10.Consumer (User-service)
@Service
public class RegisterConsumer {
    private final UserService userService;

    public RegisterConsumer(UserService userService) {
        this.userService = userService;
    }

    @RabbitListener(queues = "auth-to-user-register-queue")
    public void registerConsumer(RegisterModel registerModel) {
        userService.save(registerModel);
    }
}
11.User-service/service:
@Service
public class UserService {
    private final IUserRepository userRepository;

    public UserService(IUserRepository userRepository) {
        this.userRepository = userRepository;
    }

    public void save(RegisterModel registerModel) {
        User user = new User();
        user.setAuthId(registerModel.getAuthId());
        user.setName(registerModel.getName());
        user.setSurname(registerModel.getSurname());
        user.setEmail(registerModel.getEmail());
        user.setPassword(registerModel.getPassword());
        userRepository.save(user);
    }
}
12.Run microservices.
13.Open Postman, a popular API testing tool.
- Create a new request in Postman.
- Choose the HTTP method (POST) for your request.
- Enter the URL “http://localhost:9090/api/v1/auth/save” as the endpoint.
- Click on the “Send” button to send the request to the specified URL.

You will observe that the request sent from the auth-service is also recorded in the user-service.
In this article, I tried to explain simply how to use rabbitmq with spring boot. You can access all the codes on my GitHub account.
References:
